Jul 28, 2011

{The Creative Connection Contest}

Here's your chance to be with inspiring people and to get your creative on!
You and a friend could win tickets and free hotel to The Creative Connection in St. Paul, MN!


For your chance to win hop on over to The Creative Connection blog for the nitty gritty on entering to win! 


Good luck!


Jul 24, 2011

{The BEST Pancakes!}

I have to admit that up until recently I used to buy Bisquick, or some other pre-made pancake mix from a box, to make pancakes.  Actually, I have even bought the frozen mini pancakes (not the best)!  It wasn't too long ago that I was looking through some recipe cards and came across this FANTASTIC pancake recipe.  The pancakes are light and airy, and they are just delicious!  So, I thought I would share this kid and husband approved EASY recipe!


1 1/2 cups all purpose flour
3 1/2 tsp. baking power
1 tsp. salt
1 tbsp. sugar
1 1/4 cups milk
1 egg (I use two egg whites most times)
3 tbsp. butter (I lower to 2 tbsp sometimes)

Mix all ingredients together in a bowl with a whisk. 
Use a 1/4 measuring cup to make regular sized pancakes.  My family likes "silver dollar" pancakes, so I usually use about 1/8 of cup (or half of the 1/4 measuring cup) to make silver dollars.  Ladle onto a nonstick pan heated on medium heat and sprayed with nonstick spray, and wait until you see bubbles.  Once the pancake is covered in bubbles, flip for one more minute.

Before you flip, add blueberries, sliced bananas, chopped walnuts, or mini chocolate chips.  We like our pancakes plain here...but I have to say a chocolate pancake isn't bad once in a while.

Pancake bubble goodness...

I hope you enjoy this recipe next time you think of making pancakes!  It's a winner here!

Jul 21, 2011

{Gorgeous via Pinterest}

I really do love Pinterest.  It's like browsing a catalog online, and then being able to file all of your favorites away for future use.  Genius, I say, just genius.

Well, anyway...I've got a few inspirations that I just feel are too gorgeous not to share.

This is the insanely gorgeous kitchen from For The Love of A House.  This is my dream kitchen, and as far as I am concerned, this is a perfect kitchen.  I would not change one thing about this space, other than its location...meaning I want to move it to my house now!   Love everything in this photo...wood chandelier, brick fireplace, beadboard on the ceiling, carrera marble and soap stone counters...and look at that cabinet in the corner with a door...LOVE!  (I feel a painted kitchen island is in my future...if I could only get Justin on board.)


Here's another kitchen that I love, and it's totally different.  The rustic wood cabinets are gorgeous.  You gotta love a farmhouse sink.  How about those brick floors?  Haven't seen those since the 70's and 80's, but I love them here!


This is inspiration for our future laundry room makeover (even though I know this is a bathroom).  Blue, white, and wood...just lovely.


I like this room.  It's comfortable living to me, but beautiful as well.  I have a window behind my sofa, and this will be my inspiration on how I will finish the room.


Wouldn't this be perfect for a new baby?


And of course Sarah's house.  Sarah Richardson that is...I am her biggest fan. 


And then there's this...my future jewelry investment.  Not really expensive, but so cute...right?  I think this may remind me to have some fun!
Source: etsy.com via Dana on Pinterest

Just a little eye candy from my Pinterest to you..hope you enjoyed.

Jul 19, 2011

{Picking Paint Colors}

Have you heard of Colorcharts.org: An online database of manufacturer's standard colors?   It has swatches of all your favorite paint makers, including Benjamin Moore, Sherwin Williams, and Martha Stewart. It's a great tool to use to match colors if you don't have specific stores near you. For instance, if you don't have a Restoration Hardware near you, but love their color Silver Sage, just type in "Silver Sage" and their color formula will appear.  Click on the link and you can match it with another manufacturer's paint.  Of course, you could always ask your paint store if they have the formula for another manufacturer's color, but this helps you visualize the paint before it's on the wall.
Silver Sage from Restoration Hardware:


Colorcharts.org matches:
Benjamin Moore's Gray Wisp CC-670 by 95%:

Sherwin William's 6191 Contented by 85.8%:

Looking at these two samples, you can clearly see that BM's Gray Wisp matches the best...but I also think that Contented would look great too once it's on the wall (maybe just a bit more blue).  I definitely think these would look lovely together in a home.  I am thinking that Silver Sage or Gray Wisp will be our future dining room color, with a paint treatment, and board and baton, while Contented may be our new half bath color...still lots to think about and decisions to make.

I also used it to match paint online.  For instance, in a recent post about my favorite painted furniture line from Somerset Bay here, I wanted to match their Cotton Candy finish/paint for an end table makeover.  I didn't have a sample of their paint, so I split my computer screen into two viewing windows and looked at their paint sample, next to Colorchart's paint sample. 


Lake Country by Valspar

When I found what looked to be a match on the screen, I thought it would be a decent match in real life.  I thought Lake Country by Valspar looked like a pretty good match.
My table (Goodwill for $5)

Somerset Bay's End Table (price unknown, but pretty sure it's expensive)


Okay, I know it's not a perfect match...and I do realize Cotton Candy is a bit more green, but we aren't shooting for perfect here, and it's perfect enough for me!

Jul 15, 2011

{Little Trays...}

It all started with this...
...a wooden tray for my violets. This tray was originally built because we had a butcher block counter top on our island and I didn't want the water from the plants to cause stains on the surface of the wood top. I liked it so much I decided to keep using it on our new island, even though we don't really need it for water stains anymore. (Please, don't look at my violets right now; they aren't very happy in our new home. I just haven't found the right place for them, yet.)

Then another tray was built for our kitchen oils, spices, salt and pepper. It's purpose is to keep all the nasty residue off the countertop...

I thought one would look nice on our fireplace mantel to hold candles. The candles are quite lovely lit, and now I don't have to worry about the wax ruining our paint finish on the mantel...

This is my favorite little tray. It is filled with the little rocks that "The Kid" has brought to me as "gifts"...so sweet. He found those rocks just for me...

Then one more was built to hold our phones, sunglasses, wallets, and keys. It works to keep our junk all in one place so the junk doesn't look so bad (at least that's what I tell myself)...

They are super simple to make...

You will need:
  • Wood: 1x2 pine boards for the sides, 1x4, 1x6, 1x8, or 1x10 pine boards for the bottom (depending on how big you want your tray) cut to your desired length.
  • Nail gun
  • Stain
  • Foam brush
1. Cut the bigger piece of wood to length. The hardware store will do this for you if you do not have a saw. I used regular pine boards in different lengths for the boxes above.
2. Cut the 1x2 to fit to the ends of the bottom board and nail in place.

3. Cut the 1x2 sides to fit and nail in place.


4. Sand, if you need too. (I didn't...just so you know.)

5. Stain with your desired color (or paint). I used two coats of English Chestnut stain mixed with a touch of Special Walnut.

6. Seal with poly. For this little guy, I used spray poly. For the bigger ones, I used a foam brush and regular poly.

I made this little one for my side table next to our bed. I thought this tray would be perfect to lay my jewelry and watch on at night. 


I also thought that I might add handles, like these…

…to make them even more functional.  I picked up these utility handles from Home Depot (in the window isle, not the cabinet hardware isle.)

Go ahead, try it. What will you use yours for? I could probably find a hundred more reasons to build a tray.

I've linked...


Transformation Thursday


Jul 12, 2011

{Mudroom Storage: Reveal!!}

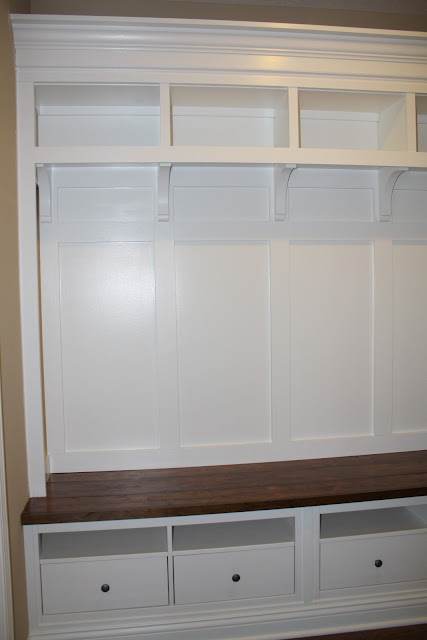
Our mudroom storage unit is finished, y'all (minus the hooks)!  And I am so happy with the way it turned out!  It's everything I dreamed of and fulfills my wish list...read here

It's white and has corbels (love)! 
And it has just a little stained wood (love even more)!
And it's ready for us to hang our junk, to be cluttered up with our life's stuff, and to be used by our family. It's ready for it all!


The bench is made from two Hemnes TV consoles from IKEA (about $150 each) and some pine boards, stained to make the wooden top.  Read here to get more details on how we put the bench together.


Then, the games began as we pieced together the upper storage unit.  It was kind of like solving a puzzle.  Starting with two 1x12 boards on each side (6 foot tall) and then a grid in the middle with 1x4's (different lengths).
Then, we built the shelves out of 1x12 boards (8 foot tall).  Using the grids as support for the lower shelf, and 1x2's for the second shelf.
Above the shelves, we used a 1x8 on it's side to add all the trim moulding.  We found a great product at Home Depot that is two sided crown moulding.  It was easy, easier than we had anticipated...for realz, we were stressing about one thing...the crown moulding!  We made one cut with the compound miter saw set 33.9 bevel and 31.6 miter for an outside, 90 degree cut, the we flipped the other side of crown around, and we had a perfect mitered corner for the crown at top.

We added corbels from the Home Depot (they were about $9 each)...because I love them! 

See the mitered perfectness...
We trimmed it all out in lattice wood, and 1x3's (fronts of the boards) and 1x2's (fronts of shelf divisions).

We painted the whole thing (even the IKEA cabinets) with Sherwin Williams Extra White semi-gloss paint to match the existing trim in house (don't forget the FLOETROL).  It took about three coats of paint...but we think it was well worth the effort!  What do you think?

We still need to add hooks...but I am still looking for the perfect ones.  I have looked in several places...but the hunt continues!

Each top "cubbie" is made to fit two Branas baskets from IKEA...with the dimensions of 9x9x9.  I see a trip to Cincinnati in my future!
All in all...we did the calculations, and adding the cost of the cabinets, lumber, crown moulding, paint, corbels, and nails, it cost us about $600 do to the whole thing!  Considering that this was an upgrade offered by our builder at $1700, we saved about $1100.  I feel pretty darn good about that!

I've linked...


Transformation Thursday