Jan 30, 2012

{My Favorite Paint Colors}

I need to paint this house.  It has been officially a year since we moved into this builder beige house, and it is driving me crazy!  We need some color up in here! 

My plan is to incorporate subdued color into each room.

Here’s my plan for the main level…
Kitchen, Mudroom, and Hallway/Entry
Nomadic Desert (Sherwin Williams)
I like this color because it’s a true neutral.  We painted this in our condo in Chicago (our little one bedroom soft loft style, with exposed brick).  We then painted our living room and kitchen this color in our old house.  We couldn’t believe it was a builder choice (1 of 6) to paint in this house.  The only problem…they would only paint the whole house one color.  So, we chose this, because we knew we liked it…but most of the rooms will change.

I also love these for a nice neutral color…
(SW) Rice Grain
(SW) Macadamia

Half Bath (Powder Room)
Beach Glass (Ben Moore)


I love this color.  It’s a nice gray, blue, green color.  It looks clean and fresh, and looks great with brown, beige, and yellow.  It’s very similar to…

Restoration Hardware’s Silver Sage
Silver Sage
Restoration Hardware’s Pale SilverPale Silver

I also love RH’s new addition…pale silver.  We are thinking to adding the Pale Silver color to the dining room.
Family Room
Grant Beige (Ben Moore)


Den (front small living room – with only one small window)
Revere Pewter (Ben Moore)

But I also love…
Gray Owl (Ben Moore)

…and
Stonington Gray (Ben Moore)


With a little bit of this fabric from World Market…

Morning Room
(light filled room, filled with lots of windows – currently “The Kid’s” play room)
Ancient Marble (Sherwin Williams)

And leave it to Martha for beautiful color choices and combinations…
                                                Source: marthastewart.com via acharmingnest.com on Pinterest


My favorite tool for online colors picking is Colorcharts
image

I like to see how they look on the strip.  For example, I love the color Beach Glass…it’s always nice to see the strip of color and the other colors around it in the spectrum.  I also love how it has a "match this color" feature, so if you don't have a Restoration Hardware near you...but love their Silver Sage paint color, you can always use the match feature to get it color matched from another paint company!  It's really the little things in life...isn't it?

image

So, there you have it.  What are your favorite colors?  Mine aren’t set in stone, and you never know.  Once I get the sample, and get it on the wall…I almost always change my mind. 

Jan 26, 2012

{Am I missing something?}

Okay, I certainly don’t claim to be a “design” expert.  Actually, I can’t really claim to be an expert on anything.  So, I thought maybe I would ask all of you.  I recently spied the Splayer Sofa from Anthropologie online…

And I was just wondering…am I missing something?

Really?  $6500 + $300 for shipping?

I don’t get it?  I mean I love Anthropologie.  I really do…I just bought these colorful bowls (love).

I also have this coffee cup…personalized with an E (love).

But I don’t get this… 

Really?  It kind of makes me chuckle just a little. 

I do have a few questions:

1.) How many of these sofas have they sold?  Thousands?  I would like to see pics.
2.) Who are the people purchasing this sofa? I think I would like to hang out with them.
3.) Again, am I missing something? 

This would be great fodder for Catalog Living.  Have you ever read this blog?  It’s hilarious…and you really need to check out the funny exchanges and thoughts of Gary and Elaine.

This one just so happens to be from Anthropologie…

The owl assumed her fate was sealed, until she heard the familiar clip-clop of her
old pal Lightning.

(Source: anthropologie.com)

Jan 23, 2012

{Reader Question} A Kitchen Island…with Charm

I love the comments and emails that I get from readers.  Let me assure you, I read them all…every last one. 

I recently got an email from a woman in Florida named Dena.  She wrote:

Hi Erin, I wanted to ask your advice if you do not mind.  I am looking to get a kitchen island.  (not something built in)  I am looking for something with a little character, not just your "run of the mill" bland island, per se, and I don’t really want to break the bank...I know you get that. :)  If you were looking for a piece of furniture or something that you could find for a kitchen island, where would you look?  I have looked at IKEA and that is a possibility.  But i am looking to see what other options might be out there too.

Any thoughts or suggestions you might have would be much appreciated!  :)

Oh, Dena…I’m so glad you asked!  I always have thoughts and I personally love islands.  I especially like islands that look like furniture or an old piece of furniture…but there are so many out there, I know it’s hard to choose and to find the right look.

We redid our island in our old house.  It was a builder basic rectangular island that we added bead board to the sides and back, thick baseboard moldings to the bottom, framed out with lattice wood trim and a fresh coat of white paint (color matched to match our trim and baseboards that already existed in the house).  We added a DIY stained and sealed butcher block countertop that we picked up from IKEA.  When we sold our house, our buyer said that our kitchen re-do and island was what sealed the deal.  Now, comments like that make a girl and guy feel good…especially after the time we took on this project.
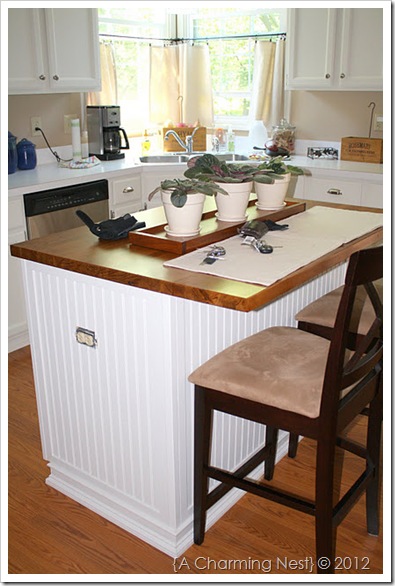
island

Notice the keys, the wallet, and the black thing (I have no idea what that is)?  Plus, we hadn’t even reinstalled our outlet cover.  Rookie.

Now, we have a HUGE built in island that I’m not totally crazy about.  It’s a little builder grade…but I have big plans for it in the future (like summer vacation plans).

If I were to build a home from scratch, or remodel an older home from the studs, I would probably choose an island that looks more like a free standing piece of furniture.  There is just something I love about eclectic and original pieces…especially in the kitchen.

So, I put together some options for Dena.  I am not sure about what she has in her kitchen as of now, or the size, but I hope this helps in her search for the perfect kitchen island that suits her needs.

First up: Pottery Barn

I do love Pottery Barn for all things, including inspiration.  We have a few items of furniture from Pottery Barn and we have been happy with them.  Our queen headboard and “The Kid’s” full headboard I found on clearance from Pottery Barn online.  We also have a coffee table and two side tables from them in our family room.  I found a few islands that I thought looked rustic and charming for a kitchen of all colors and finishes:

1.) The Abbot Zinc Top Island (love) for $999.  I know what you’re thinking…it’s pricey.  Hey, I’m just throwing out some options, not knowing a budget.  But don’t you just love the hooks, the metal towel bar, and the wheels?


2.) The Belmont Buffet sells for a whopping $1299, and would make a great island in a rustic retreat.  (I hate that this is so expensive…I really do.)  This island is made from unstained wood, so you can pretty much customize it to whatever you like.  Just an option…


3.) This island is from IKEA.  For about $200 I think it is a good option to the PB’s Abbot Island (above).  It can be stained and/or painted.  I also like the rods, which would be a great place to hang tea towels, or use their Grundtal S hooks to hang utensils for convenience.  Baskets can be placed on the shelf and/or under for extra storage.


4.) Another island from IKEA, is the Flytta Kitchen Cart, which would fit in most kitchens to add some industrial flair.  I like this island a lot.  I even like the idea of spray painting the legs and shelves with Rustolium paint…if you like.  Chippy turquoise, white, or red would look pretty cool on this…if you ask me.  Baskets would look awesome on this for storage, along with some antique crocks…giving it a “new meets old” feel.  Hanging sweet tea towels on the side would make it look even more charming.  Coming in at $159, I think this island is quite a bargain…plus you can take it with you if you ever move.


5.) And for more of a furniture looking island, I like this one from Home Decorators online for $329.  It comes in different sizes and different tops…so you have lots of opportunity to get what you want for your space.

Here it is with a wood top…


And here it is with a black granite top…

White Kitchen Cart


6.) This one comes in the mid-price range at $449 on sale ($499 regular) from World Market Cost Plus.  I think the Farmhouse Butcher Block Kitchen Island is lovely, and pretty substantial looking. 


7.) And finally, my favorite!  I would buy this one in a heartbeat.  I love its rustic qualities, and it can be painted to customize it even more (although I love the chippy paint).  I just saw a cupboard for $6000 at Anthropologie that had this same exact finish…I drooled.  I am going back this weekend with my camera and my paint color fan deck…because I’ve got big plans.

Again, this one is from World Market and is the Camille Kitchen Work Table which I think is divine for only $229.99 on sale from $269.99.  I love the wood top and the chippy paint.  I probably wouldn’t paint it, but you could.  Just imagine baskets on the bottom and antique crocks.  You could even add small hooks and a metal towel bar to the aprons to hang tea towels and utensils from the side.  I think this is what I would choose…if I were the one choosing. 


Camille Kitchen Work Table | World Market

Well, Dena…there you have it.  I hoped I helped a little.  If not…you can always email me again and I would be happy to search out some other options for you! 

***P.S. No one paid me for these reviews. These are just my opinions about islands after visits to actual stores and online.

Jan 19, 2012

{Stuffed Pepper Soup}

Trying recipes and working on becoming dairy and gluten free has been pretty easy for me (so far)…thanks to my mom, Lara Bars, and coconut coffee creamer.  My mom has been helping me research recipes that I could easily do.  We also talked about some recipes that we already do that would easily be converted to gluten free.

For example, our Slow Cooker Chicken and Pork Tacos that I wrote about here, originally called for a pack of taco seasoning.  Instead of using the taco seasoning pack (which a lot of times has gluten), we opted to make our own on Tuesday when we made our tacos in the slow cooker.

1 tsp. cumin
1 tsp. black pepper
1 tsp. sea salt
1 tsp. paprika
1 tsp. garlic powder
2 tsp. chili powder
crushed red pepper to taste
salt and pepper to taste

We also made a Stuffed Pepper Soup which I thought it was the bomb-diggity, so I thought I would share the recipe we used!

IMG_2933-1

Here it is:

2 lbs. ground beef (we used sirloin)
3 chopped onions
1 bag of frozen chopped green peppers (we got ours from Kroger, but you could always use fresh – 2 1/2 cups of chopped green peppers)
1 (28 oz) can of diced tomatoes
1 (12 oz) can of tomato paste
1/2 box of beef stock (make sure it’s gluten free if you need it to be)
2 cups of water
2 cups of brown rice (pre-cooked – we used a mixture of short grain and long grain)
salt and pepper to taste

Before you prepare the soup, cook your rice.  I do not use the quick cooking kinds of rice.  I usually find them too mushy.  Although, I have had great luck with the frozen brown rice at Trader’s Joes.  I usually buy the dry rice brands from Kroger and Whole Foods which both take about 2 cups of water for 1 cup of uncooked rice with 40 minutes of cooking time.

Brown your meat in the stock pot.  Add the diced onions and half of the green peppers.  Cook veggies until they are kind of soft.  Add the can of diced tomatoes, the can of tomato paste, half of the box of beef broth, and the 2 cups of water.  Mix thoroughly to get the tomato paste all mixed through.  Add desired amounts of salt and pepper.  Once the soup heats through, add the rest of the green peppers and the rice.  Simmer for 30-40  minutes and enjoy hot!

IMG_2943

Jan 18, 2012

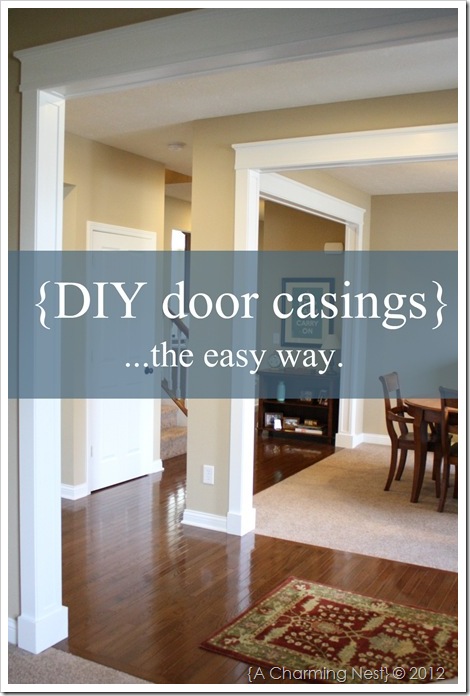
{DIY Door Casings}…the easy way.

We finally finished our door casings!

IMG_2868-1

And although it was a pretty easy project, it did seem to take us a long time.  We just couldn’t seem to find a stretch of time to finish.  We’ve been done with this project for a couple of months, but picture taking has been on the back burner. 

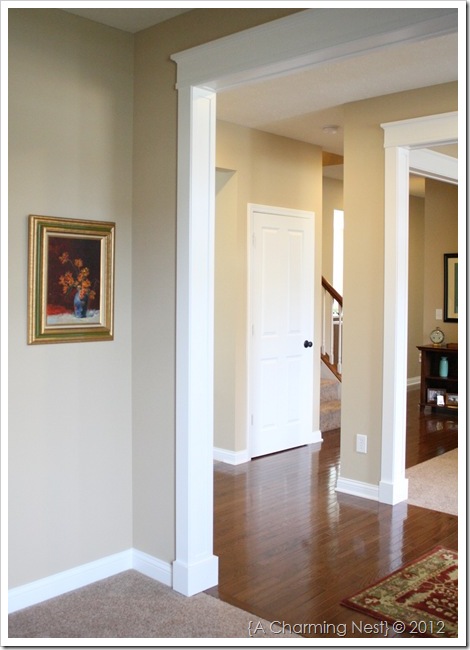
Overall, I think they look great.  And I am surprised at how they lift the overall look of our ceilings, which I think help make our rooms look taller and larger.  We succeeded in finding a way to remove/demolish very little of our house.  We removed absolutely zero dry wall, and very little of our baseboards, to get a great look!

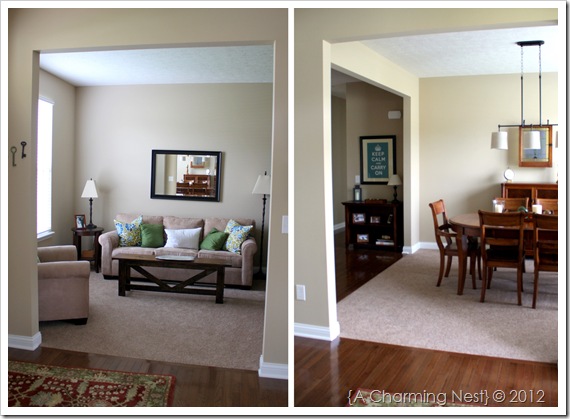
We have rather large entries, which include one to our front room (a den or small living room) and two to our dining room.  Here is the way they looked before we added the casings…

Door Casings

Pretty blah.

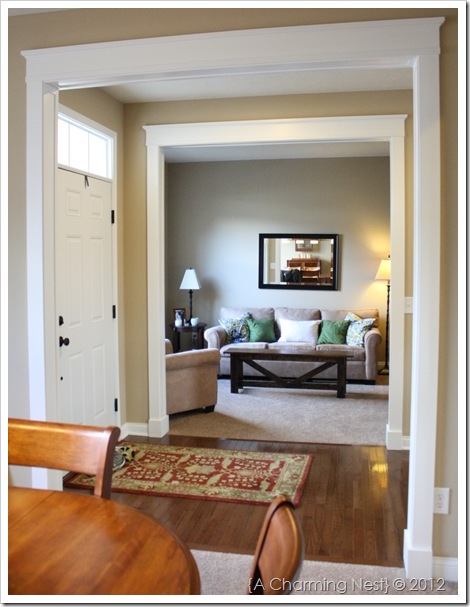
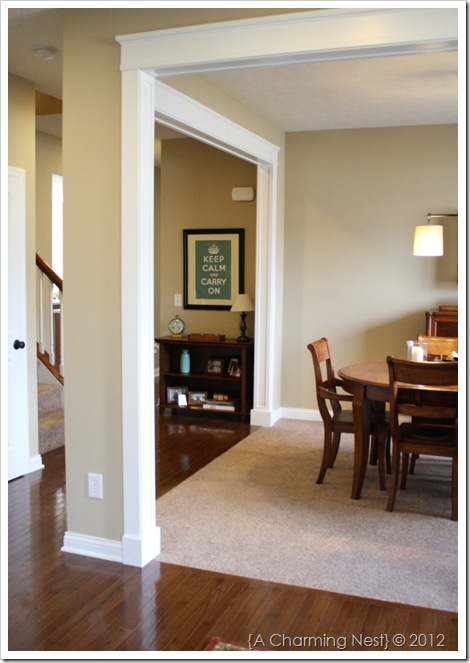
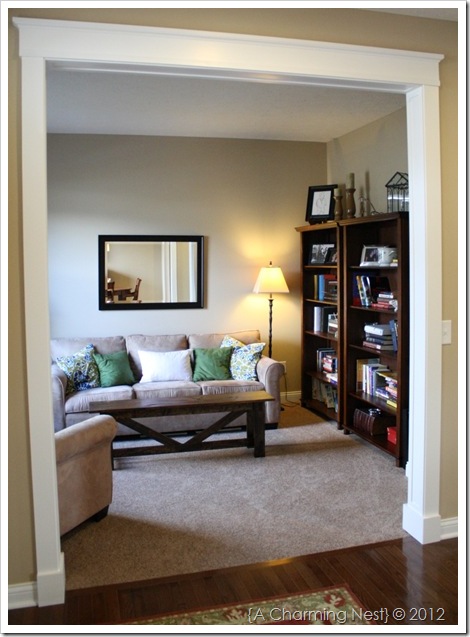
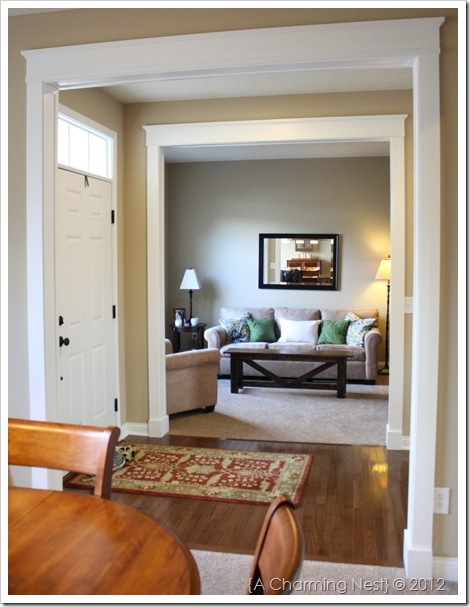
And here is how they look now…

IMG_2874

IMG_2869

Here is what you will need for each casing:
Dremel Multi-Max
Nail gun (I wouldn’t do this without it!)
Miter saw
Screw driver
Utility Knife
1x4 (x 4 for both sides of the casings, measured from the floor to the top height)
1x6 (x2 for both sides of the top of the casings, measured for the width of the casing)
1x6 (for the base shoe of the casing)
lattice…and a whole bunch of it!

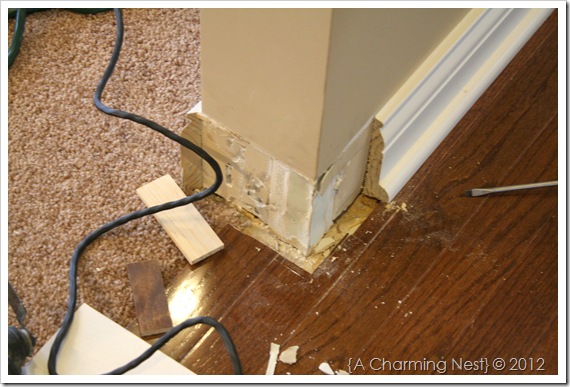
Stage 1: Taking Away Woodwork (Side note: This step made us a little lot nervous.)

We used a Dremel Multi-Max and measured the exact width of the vertical board and marked our baseboard.  Then using the Dremel, we cut it straight and removed the piece of baseboard.  This method allowed us NOT to remove the entire baseboard.

IMG_1807

Stage 2: Adding The Woodwork

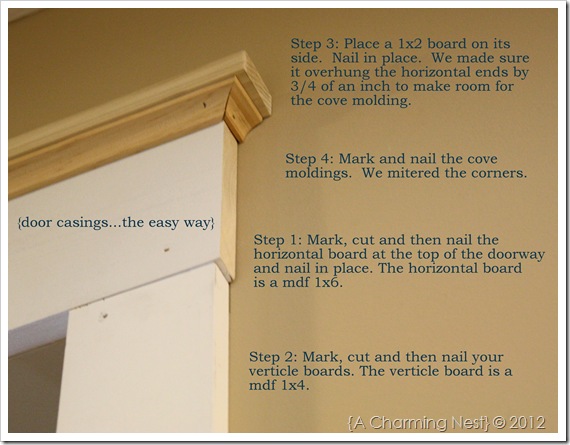
This was really fun because our vision was coming to life!  Through trial and error, we found that nailing the top (horizontal piece of the wood) first, and then adding the vertical pieces was best.

IMG_1840

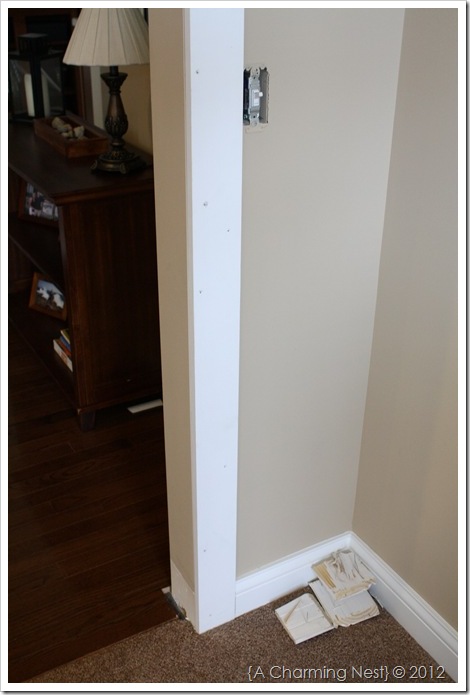
And here is what it looked like with just the vertical pieces nailed and in place. (Oh, and by the way, we had to take off the switch plates.)

IMG_1829

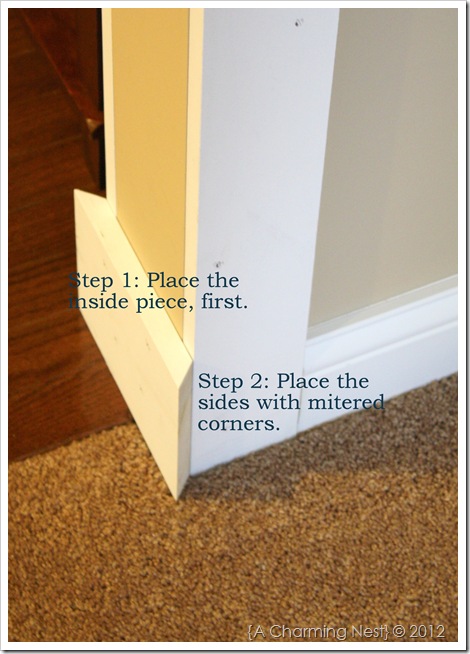
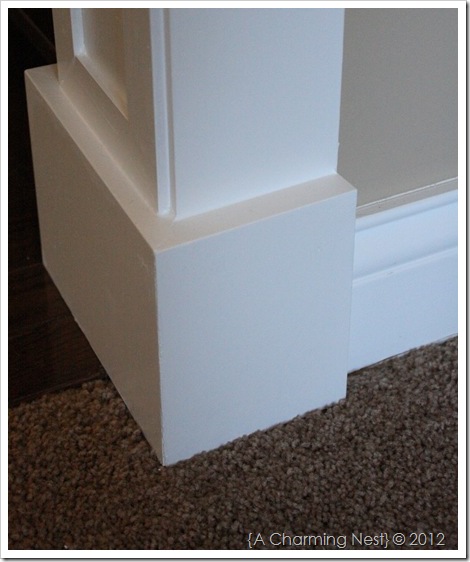
We had to add a base shoe to each side because you could see where the floor was cut, and didn’t really meet up with the wall.  (See above picture)

For the shoe, or the base of the casings, we used a 1x6 and essentially just wrapped the base of the opening…

IMG_18421

IMG_2891

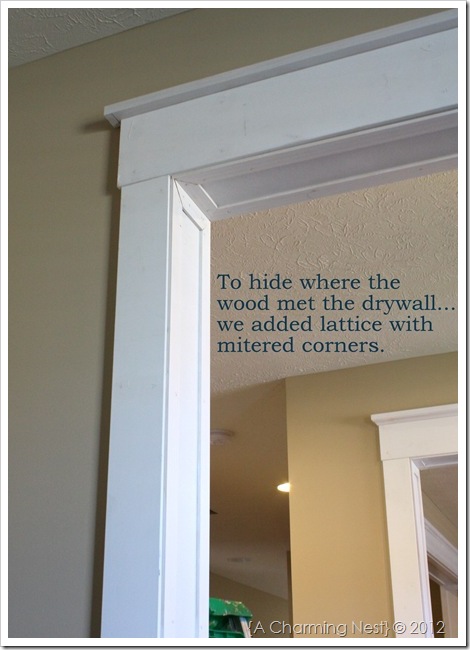
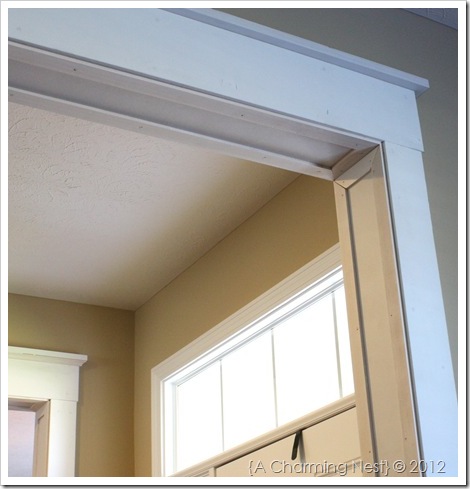
Notice in some of the pictures above, how the wood meets the dry wall?  Obviously, we didn’t like it.  And we had to cover it up…somehow! So, we added lattice to frame it all out and to hide those seams. We primed the lattice before nailing it up to the wall. 

The pictures below show the casings without the cove molding under the 1x2. 

IMG_2223

IMG_2222

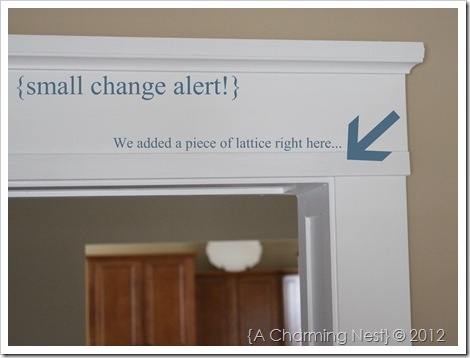
Small Change Alert!

We added a thin piece of lattice to the bottom of the horizontal piece of 1x6.  It framed the whole look out nicely, and just adding a detail we felt we were missing.

IMG_2888-1

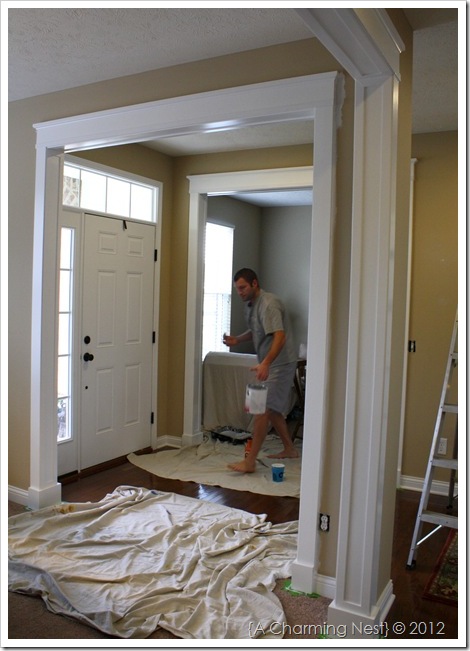
Caulk, spackle, tape and paint with the same paint that matches your trim.  We caulked the where any piece of wood meets the wall or any other piece of wood. (Our trim happens to be Extra White by Sherwin Williams in semi-gloss.)

IMG_2228

Look at that handsome painter…  He’s a good one, I tell ya.

And here are some more “after” pictures.  We are so happy with them! 

IMG_2866

IMG_2878

IMG_2874

We have two smaller entries that lead into our kitchen and our “morning room.”  Our morning room is a window filled room that we have converted to a play room for “The Kid.”  I love that it is off the kitchen, so we are always together.  I have big plans for these casings!